How to set up fee management in Kriyo?
Setting up Fee Management in Kriyo is quick and simple. It’s a one-time setup with two key stages.
- Create your fee structures
- Link your bank account
These can be done in parallel, helping you go live faster and start collecting fees seamlessly.
How to enable in-app fee payments in Kriyo (for schools in India)
Step 1: Configure the Academic Year
Before creating fee structures, configure your Academic Year to keep invoices organised.
Fee structures can then be reused or adjusted in future academic years.
💡 Tip: This setup is available only on the web.
On Kriyo web
- Log in to your Kriyo Web account using the same login credentials as your mobile.
- Go to Admin Tools → Configurations → Academic Year.
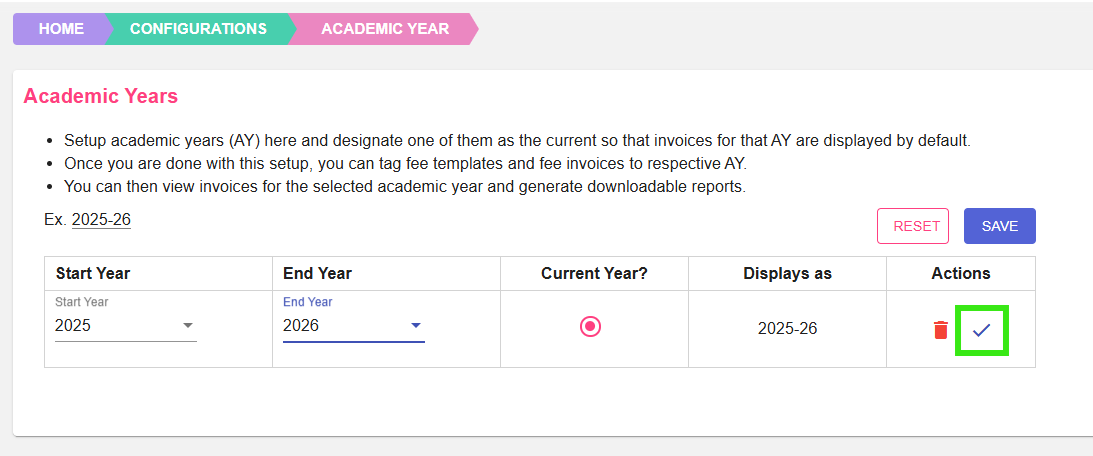
- Select the Start Year and End Year, then click the tick mark and Save.
- To add another academic year, click + NEW, enter details, mark it as Current Year, and save.
Step 2: Create Fee Types
By default, Kriyo provides sample fee types, which can be edited or deleted.
To add new fee types:
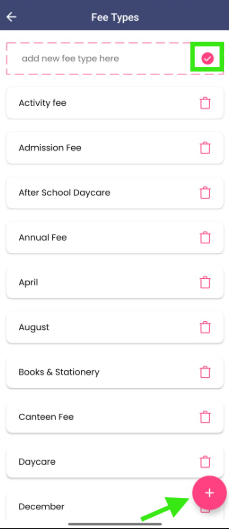
- Go to Admin Tools → Tag Settings → Fee Types.
- Tap + (bottom-right corner).
- Enter the Fee Type name and tap the ✓ (tick) button to save.
Note: Duplicate names are not allowed and are case-insensitive.
Step 3: Create Reusable Fee Templates
A Fee Template is a reusable format for generating invoices quickly and accurately.
Instead of creating invoices from scratch each time, simply build templates once and reuse them.
You can create multiple templates such as Monthly Fee, Quarterly Fee, or Annual Fee.
💡 Tip: Template names are internal and not visible to parents.
⚙️ Pro Tip:
For faster setup, it’s best to create or edit fee templates on Kriyo Web. The web version allows you to copy existing templates and make small changes — saving time compared to creating each template from scratch on the mobile app.
Steps to Create a Fee Template
- Navigate to Fee Templates
- If the current Academic Year is not configured (see Step 1 above), it will show as ‘None’.
- If configured, the Academic Year will appear at the top, and all fee templates linked to it will be displayed below once created.
- Add a New Template
- Click the ‘+’ button at the bottom right corner.
- Enter a Template Name (e.g., Monthly Fee, Annual Fee).
- The current Academic Year will be auto-selected. You may change it if needed.
- Select the Payment Gateway Account through which the fees will be collected for all invoices generated using this template.
- Choose the Fee Type (e.g., Tuition Fee, Activity Fee).
- Enter the Amount and Due Date.
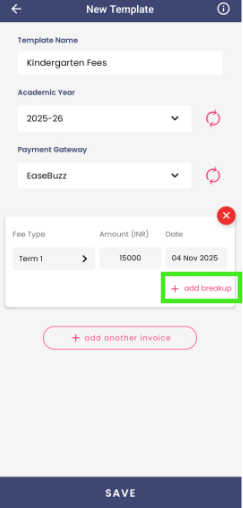
- Click ‘+ Add Breakup’ to provide a detailed breakdown of the total fee (e.g., Tuition, Transport, Materials). To add another row or component in the breakup, click on ‘+ add line’.
- If you don’t wish to display a breakup, you can skip this step.
- Schedule Invoices with Fee Templates
- Plan and send invoices for the entire term upfront.
- Let the app automatically send reminders closer to each due date.
- Ensure parents are informed well in advance.
- Eliminate the need for manual reminders or follow-ups, saving you significant time and effort.
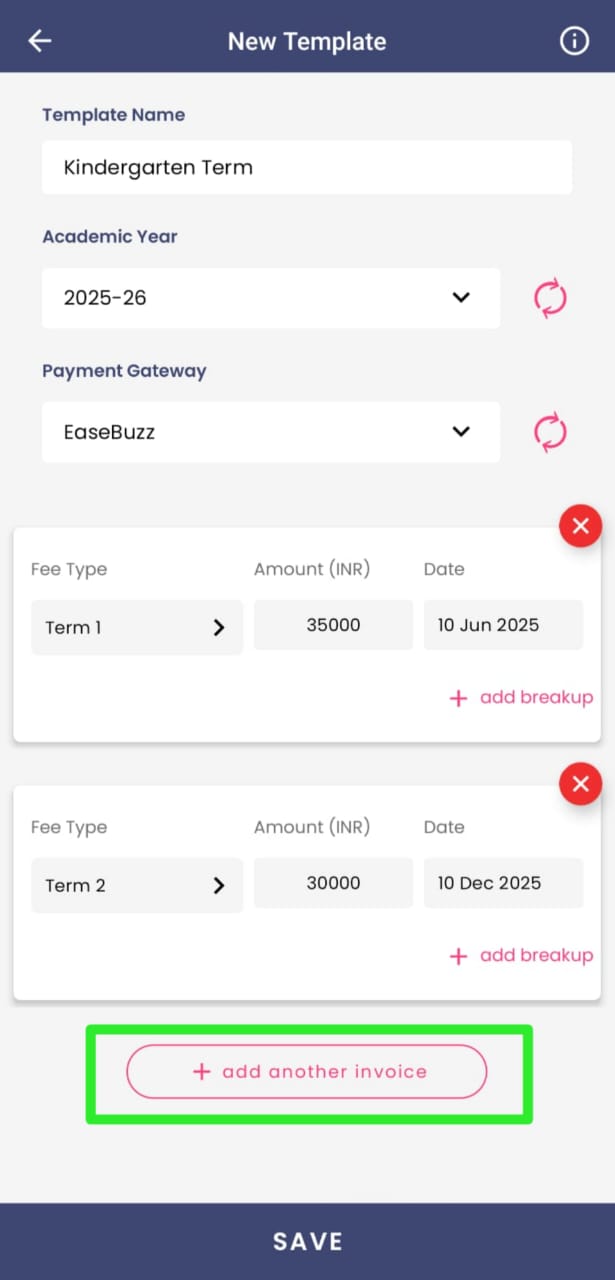
- Click on ‘+ Add Another Invoice’.
- Select the Fee Type, Amount, and Due Date.
- Repeat for All Instalments
- Continue adding as many invoices as required (e.g., monthly, quarterly, or custom instalments).
- Once all invoices are added, review and click Save.
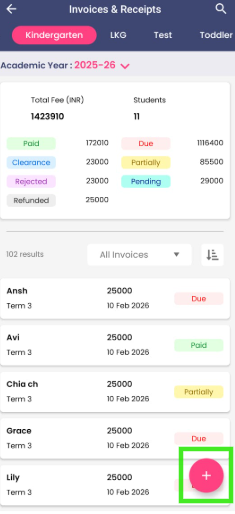
- Go to Fee Invoices in Track & Act.
- Select the Program for which you want to generate invoices.
- Click the ‘+’ button.
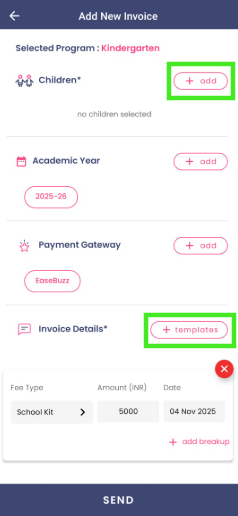
- Click ‘+ Add’ to select one or more kids, then click ‘Done’.
- Click ‘+ Template’ and choose the required Fee Template.
- Academic Year and Payment Gateway will be prefilled if added in the template; otherwise, you can select them manually.
- Make adjustments if required (e.g., change the Due Date, apply a Discount).
- Review the invoice and click Send. Parents of the selected children will be notified instantly.
Go to Admin Tools > Fee Templates.
💡 Note: To create or edit a fee template with a tax component, log in to Kriyo Web. These templates can still be accessed and used for sending invoices from the mobile app.
If you collect fees in instalments or on a monthly/quarterly basis, you can schedule all future invoices within a single Fee Template.
This allows you to:
Steps to Add Multiple Invoices to a Fee Template
Step 4: Sending Invoices
Once your Fee Templates are ready, you can start sending invoices to parents.
Note: These changes apply only to this invoice and do not affect the original template.
In Summary
Kriyo simplifies the entire fee management process — from creating fee types and templates to sending invoices and automating reminders.
It reduces manual effort, ensures accuracy, and provides a professional experience for both schools and parents.
Related Articles
Related FAQs