How to enable in-app fee payments in Kriyo (for schools in India)?
Why Enable In-App Fee Payments in Kriyo
You don’t have to waste time verifying UPI screenshots, checking bank statements, or following up with parents for payment confirmation anymore.
By linking your bank account to a payment gateway through Kriyo, parents can:
- Pay fees directly within the Kriyo Parent App
- Avoid the need for QR codes or manual transfers
- Instantly receive receipts once payment is successful
- Allow your school to have real-time payment tracking and automatically updated reports
Note: Schools must have a current bank account to enable this feature.
Process to Enable In-App Fee Payments
Step 1: Identify the Entity Type
Select the entity type under which your school or organisation operates:
- Trust
- Society
- Sole Proprietor
- Partnership
- Private Limited
- Limited Liability Partnership (LLP)
- One-Person Company (OPC)
Step 2: Submit the Required Documents Based on Your Entity Type
Note: Please send all documents separately — do not combine them into a single PDF.
Trust
- Email ID and mobile number to receive payment updates
- PAN of the trust
- Trust Deed
- PAN and Aadhaar (front and back) of the authorised signatory - self attested
- Cancelled cheque (with printed name) or bank account statement with address
Society
- Email ID and mobile number to receive payment updates
- PAN of the society
- Society registration certificate and bylaws
- PAN and Aadhaar (front and back) of the authorised signatory - self attested
- Cancelled cheque (with printed name) or bank account statement with address
Sole Proprietor
- Email ID and mobile number to receive payment updates
- PAN of the proprietor
- Business registration proof (any one of the following, all pages):
- GST Certificate (if annual revenue exceeds ₹40 Lakh)
- MSME Certificate
- Shop & Establishment Certificate
- Trade Licence issued by the local authority
- Aadhaar (front and back) of the authorised signatory
- Cancelled cheque (with printed name) or bank account statement with address
Note: If you are linking a personal account, it must be a current account.
Partnership
- Email ID and mobile number to receive payment updates
- PAN of the partnership firm
- Registration proof (any one of the following, all pages):
- GST Certificate (front and back)
- MSME Certificate
- Shop & Establishment Certificate
- Trade Licence issued by the local authority
- Partnership Deed
- PAN and Aadhaar (front and back) of the authorised signatory
- Cancelled cheque (with printed name) or bank account statement with address
Private Limited / LLP / OPC
- Email ID and mobile number to receive payment updates
- PAN of the company
- GST Certificate (all pages)
- Certificate of Incorporation
- PAN and Aadhaar (front and back) of the authorised signatory
- Board Resolution — use the attached format on your company letterhead, signed and sealed by two authorised signatories.
- The resolution must be certified either by the Company Secretary or two Directors (for OPC, one Director is sufficient).
- 📎 Attached File:
- Cancelled cheque (with printed name) or bank account statement with address
Step 3: KYC Verification
Once your documents are received, the Kriyo team will initiate the KYC verification with the payment gateway partner.
Step 4: Account Activation
After successful KYC, your in-app payment account will be activated within 3–4 business days.
Parents can then pay securely through the Kriyo Parent App, download receipts instantly, and see real-time payment updates.
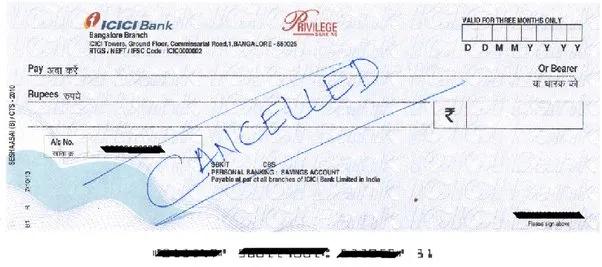
Note: In the sample cancelled cheque image, the account number and account holder name are masked only for confidentiality.
When sharing your own cancelled cheque, do not strike off or hide these details — they must remain visible for verification purposes.
Related Articles
Related FAQs